|
|
Post by Ghostbluesman (Ghostsoldier) on Mar 23, 2013 13:01:41 GMT -5
While I was in there, I noticed the ol' gal has some serious rust issues at the cowl area going on.... 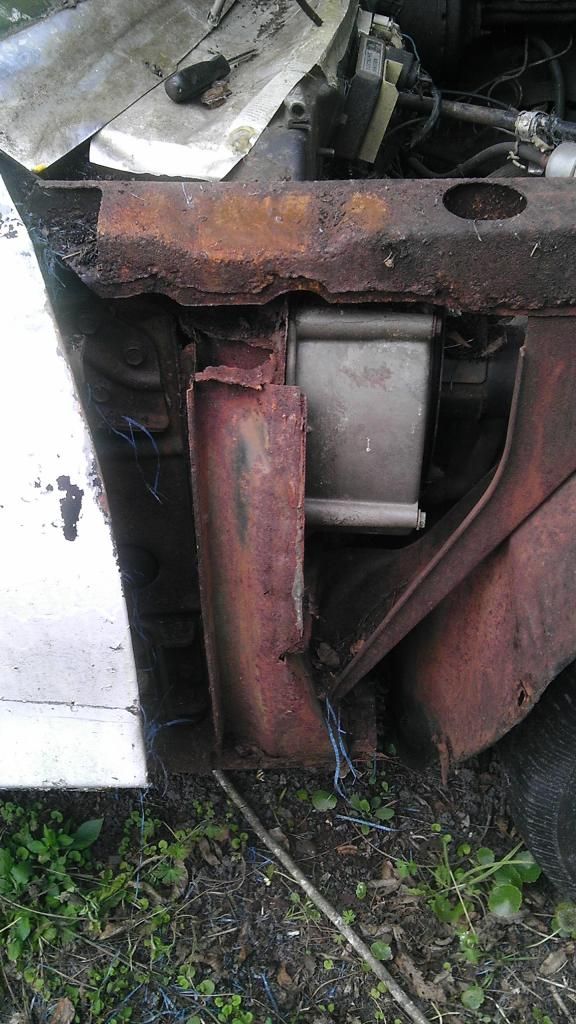 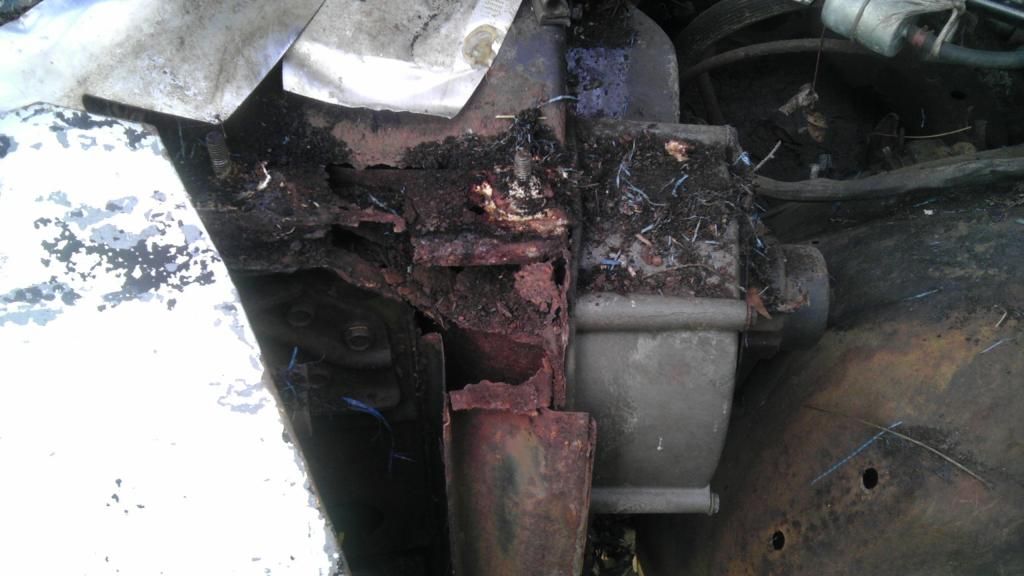 Here's where I'm asking some advice on handling this: I'm not a body man, nor am I an experienced welder, and I'm not going to restore this vehicle to "show car quality", so ripping it all out and replacing with fresh steel ain't gonna happen, either....but, I do want to stop this from progressing any further. My idea was to use the "rust converter" chemical on the really bad areas, then tack weld a patch or two over the gaping holes and to add rigidity, seal the inner cabin holes (if any) against any inclement weather, and then prime and paint it. Opinions? Rob |
|
|
|
Post by countrybunker on Mar 23, 2013 18:50:03 GMT -5
Ouch!! That is some serious cancer rob!! Is the front stud for the fender/hood hinge lower then the rear stud? Looks like it in the pics.. Might have to rip it all out of there, and do some fab work to make em even... I feel for you man! Just delt with all that shit!
|
|
|
|
Post by 58hemifury on Mar 23, 2013 19:35:38 GMT -5
Your best bet is to find a donor Monaco or Fury, cut the rot out and weld in a section from another car, it might be more work but it will pay off in the end if it's done right. Rust converters are band aids, temporary (usually VERY temporary) repairs that make you think you stopped the rust. It may slow it down but not enough to preserve your car for any significant amount of time unless it lives in a humid/moisture free environment at all times. It looks like your car is an original Police Package car so I assume it is, definitely worth putting the extra time/money into to do it right.
Just my 2 cents,
Adam
|
|
|
|
Post by tk826 on Mar 23, 2013 20:03:20 GMT -5
Cool to see the progress... sad to see the rust.
I can't help but feel that it would not be that way if H had left the original fender on the car.
But wadda' ya' gonna' do, right?
Keep it up Ghost, we know you'll get there.
This is a build that I've been waiting to watch for a while now.
I'm excited to see it underway.
|
|
|
|
Post by Ghostbluesman (Ghostsoldier) on Mar 24, 2013 21:20:10 GMT -5
Yeah, Zac, it is a bit lower...I think it's because of the damage that Huey told me he let his kids do to the old fender, like smacking it with hammers and such.  Adam...yeah, I agree 100% that's the correct way to do it; however, several factors are working against me: I don't have a donor car, or access to one, or the funding for one (or the wife's blessing for another one); even if I did, I don't have the skills to do a re-weld myself, nor the funds to pay for it professionally (did I mention I'm cheap?). I believe, though, that I can probably do as Zac suggested, and perform some home re-fabbing in this area to bring it up to par (no leaks, structural support). Since it's hidden under the fender anyway, it's not super critical for it to be 100% stock, or pretty...at least, not to me.  Thanks, tk. It's the encouragement I get from you fellas here on the forum, that gives me the incentive to keep pushing on this project, and tackle all the issues...it really is appreciated.  Rob |
|
|
|
Post by Ghostbluesman (Ghostsoldier) on Mar 24, 2013 21:35:34 GMT -5
One a happier note, my intake gaskets finally got here yesterday, so when it quits raining cats and dogs here, I'll be able to start reassembling the 440....just need to get some plus wires, a fuel pump, oil, some odds and ends (and, oh yeah, rebuild the T-Quad), and I hope to crank her up in a week or so, on the ground, to see how she runs. Rob |
|
|
|
Post by spanks79 on Mar 25, 2013 7:16:59 GMT -5
That's nasty! I hate to see it.  Do you have the dash in the car? It would be nice to see the inside above the fresh air intake / recirculate valve. It would be nice to "repair" this but you should be able to patch it up somewhat successfully. The biggest challange is to keep water out of the interior. I would start with removing the trim at the base of the windshield and exposing as much of the cowl as possible, I would even concider removing the front passenger door. Get out a shop vac and suck up and clean up all the loose crap and reevaluate. Although far from a perfect repair, I could actually see using some sheet metal and creative application of seam sealer to band-aid it up. I'm going to take a closer look at my cars today so I can see what it's suppose to look like. Hell, if need be I could cut a big chunk out of the corner of my parts car (its rusty, but not that rusty) and you could weld it into your car. It would be cheaper than buying a parts car! |
|
|
|
Post by Ghostbluesman (Ghostsoldier) on Mar 25, 2013 9:33:27 GMT -5
Thanks, Spanks (hey, that rhymes, lol) for the offer...I may take you up on that! In the mean time, I'm going to take your advice and clean it up a little better, to see what I've got. If you notice in the upper pic, a previous owner took the liberty to add a strip of aluminum lengthwise under the lower windshield trim band, covering the cowl vents (I'm assuming)...why it was done, I don't know yet. Also, a liberal bead of still-intact clear silicone was added to the crack between the glass and the upper edge of the windshield lower trim band, maybe to keep out water and prevent more rust....you can see a portion of it in the same pic. I really won't know until I pop that off, and have a look-see under there; it's supposed to dry up here this week, so I'm going to try to dig a little deeper into this mystery. Rob |
|
|
|
Post by Sd.Kfz. 400 on Mar 25, 2013 10:03:00 GMT -5
It must be something special to hide rust. And add rust, because the cowl doesn't "breathe" well like that.
Silicone against metal is a winner's choice too(assuming it has acetic acid in it, most of them have it).
Water itself isn't that bad, the rust comes when the water doesn't get out.
|
|
|
|
Post by 58hemifury on Mar 25, 2013 19:13:19 GMT -5
If you are going to "cover up" the rust I'd recommend POR 15 or a similar product. They work much better than converters in my opinion. There was another brand like POR 15 in an orange can that I used to see at swap meets and it was cheaper than real POR 15 and worked just as well, I can't recall the name.
|
|
|
|
Post by spanks79 on Mar 25, 2013 19:27:41 GMT -5
I noticed that piece of aluminum there. Unfortunately I bet the cowl is rusted thru and was allowing water to enter the passenger compartment so the cowl vents were likely sealed to prevent water from entering.
|
|
|
|
Post by Ghostbluesman (Ghostsoldier) on Mar 26, 2013 13:03:00 GMT -5
That might explain why my damned floorboards are rusted out. Rob |
|
|
|
Post by Ghostbluesman (Ghostsoldier) on Mar 28, 2013 12:59:29 GMT -5
I found some stuff made by Jasco, that converts rust to a black, paintable surface. It's 6 bucks a quart, at Lowes...I think I'll give it a shot. Rob |
|
|
|
Post by Ghostbluesman (Ghostsoldier) on Apr 7, 2013 21:48:26 GMT -5
Okie dokie....the rain around here has been beating me up a little, but it's finally dried out for a few days, so I'm getting some stuff done....I'll post some new pics later this week. In the man time, here's a request: Does anyone have a fan belt and accessory routing diagram for the Monaco with a 440? Or alternately, some good photos of the routings? While studying my current set-up, I realized that I might not have enough grooves on my top (fan) pulley...it only has a single groove (since the Dart didn't have power steering). The crank pulley has a double-groove pulley, which I figure the rear groove will run the alternator and air conditioner compressor as it matches the fan pully groove alignment, but I don't have another top groove to run the power steering pump (sorry I don't have any photos). In order for me to figure this out, I'm going to need a diagram and/or some pics of current big-block Monaco setups, if anyone can help....something visual will go a looong ways in helping me understand what I need. Rob |
|
|
|
Post by Lord Vadus on Apr 7, 2013 22:31:59 GMT -5
I'll take a picture of my 400 tomorrow; for now, this is the best I can do:
|
|